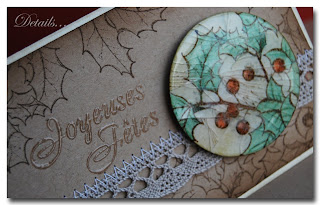
Hello! Here's another tutorial for you! Something really fun and easy!
Bonjour! Voici un autre tutoriel pour vous! Quelque chose d'amusant et facile!
1) Start with stamping an image on white cardstock.
1) Commencez par tamponner une image sur du papier blanc.
 2) Use a color medium of your choice. I used colored pencils.
2) Utiliser ce que vous voulez pour coloriez votre image. J'ai utilisé des crayons de couleurs.
3) Découpez une portion de votre image.
4) Utilisez une couleur Distress pour vieillir votre cercle.
5) Make a handle from a sturdy cardstock. Adhere to the back of your image.
5) Prenez un morceau de cardstock assez rigide et attachez-le au dos de votre image.
 6) Coat well with your clear embossing ink. Cover with UTEE or a clear embossing powder. Melt with your heat gun. While the first layer is still hot, cover with another layer of the powder. Melt. Repeat two more times (maybe a few more if using a regular embossing powder). Let cool.
6) Couvrez bien avec l'encre à embosser. Puis, saupoudrez de l'UTEE ou de la poudre embosser clair. Faites fondre avec le heat gun. Pendant que la première couche est encore chaude, saupoudrez de nouveau et chauffez. Répétez deux fois (ou peut-être quelques fois de plus si vous utilisez une poudre à embosser "normale"). Laissez refroidir.
7) And now the fun part. When your embossed circle is really cooled, manipulate till cracks appear. Your heart might almost break while you're doing it, but believe me, it will leap with joy at the first crackle sound! :)
7) Et maintenant la partie amusante. Quand votre cercle est suffisamment refroidi, manipulez le jusqu'à que les craquelures apparaissent. Votre coeur en va presque craquer lui aussi, mais croyez moi, il va sauter de joie à la vue des premières craquelures! :)
You can brush your embellishment with a dark Distress ink for a more aged look. And then attach it to your creation.
Vous pouvez encore passer par dessus l'éponge avec une encre Distress foncée pour un aspect vieilli. Puis attacher votre embellissement sur une création.
There are still NO participations in our challenge! I do wonder how that is since everybody seems to be making Christmas cards these days. You don't have to use our tutorials to participate, simply create a Christmas card and link it up! We're looking forward to seeing your creativity in action! The deadline is the 29th of November.
Il n'y a toujours PAS de participation à notre défi! Je me demande bien pourquoi puisque tout le monde semble faire des cartes de Noël en ce moment. Vous n'êtes pas obligées d'utiliser nos tutoriels pour pouvoir participer, simplement créez une carte de Noël et ajoutez le lien dans la collection! Nous nous réjouissons de voir votre créativité en action! Vous avez jusqu'au 29 novembre.


20 commentaires:
Superbe tuto pour une carte magnifique.
Seulement jusqu'au 29 novembre pour les cartes,... aïe ! J'arrête de blogger et je m'y mets !
Thanks for the great tutorial. always enjoying learning new techniques or ideas!
FABULOUS tutorial, Agata! Thanks for the inspiration!! The card is stunning!
C'est trop trop fort !!!!
Bravo !!!!
Love that technique . . . and I will be entering a card, but had a week brimming over! (In fact spent the whole of saturday teaching a book in a box course -I'm sure the book was from Lucky or Scrap RDV) and the afternoon, we did Inspiration and Design with a focus on white space with thanks to Virginie and used Lucky's sketch to do our page. Will post soon)
Thank you for the wonderful tutorial Agata - love your cards!
Jenifer Ann
this is awesome! thanks for sharing Agata!!!!
I love this technique, thanks for the reminder that I should try it again! Wonderful tutorial, and your card sample is gorgeous!
Gorgeous card Agata. Thanks for reminding that I love this technique ;)
magnifique carte, tuto clair et précis bref, qu'est-ce qu'on attend pour s'y mettre?!
Merci Agata <3
Love this technique!! Thanks for showing it to us ;D I know just what I'm going to try it on!!
Great tutorial, Agata! Your broken glass technique looks wonderful in this card design! Love it.
A Real Beauty Agata!!! Thanks for this turorial!!!
Thank you so much for the tutorial Agata!!! Love the result!
Le résultat est magnifique Agata. Merci pour le tuto.
What a fantastic idea and just an easy step by step. I have got to try this out. Thanks so much for showing us how!
Gorgeous card! Thanks for the tutorial!
Superbe Agata!!! J'adore cette idée et ce petit côté vieilli que cela donne à l'embellissement réalisé... bravo!!!!
Bises
xoxoxo
Oh marrant, j'ai vu cette technique à Créativa Namur (Belgique) et c'est vraiment génial!!! D'ailleurs, je vais renouveller cette expérience...
A bientôt,
et merci pour ce tuto parfait!!!
This is a really fun idea. I can't wait to give it a try.
Enregistrer un commentaire