31 janvier 2011
Template double page
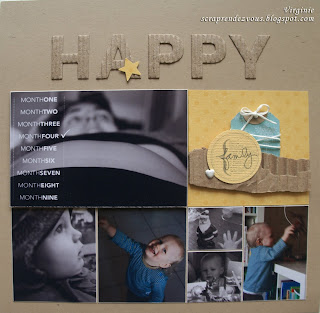
Hello! This is my last weekly appearance this month and I would like to introduce a DP template I used in my project. It has 9 Polaroid frames and the title I use for all my pages.
I hope you like it... if you use it, please post a link to your blog in the comments.
A compter d'aujourd'hui , le rendez vous "template"ne sera plus hebdomadaire (vous avez déjà une bonne base pour démarrer...si ce n'est déjà fait ;-)): je vous retrouverai donc ponctuellement tout au long de 2011 pour vous proposer des templates et voir où vous en êtes avec ce projet. A bientôt!!!
From now on, we won't have a weekly Monday template any more, because you already have a few templates you can use to start your project. But I'll be back many times all through the year to offer you more templates, so check out this blog!
29 janvier 2011
Our takes on Sabine's cards : part 2 - carterie
Bonjour les Amies! Nous revoici avec une seconde et dernière interprétation des cartes de Sabine.
***
alexandra
I have enjoyed Sabine's technique so much that I made this card thinking of her. Now it doesn't go all the way out, the circle acts more like a pocket here:
J'ai tellement aimé interpréter la technique de Sabien que j'ai crée cette carte en pensant à elle. Sabine, si tu passes par ici: "TU M'INSPIRE" ;-)
Cette fois, le message ne ressort pas de l'autre coté de la carte, le cercle joueant le role d'un foureau.
Pascale
Pour cette deuxième carte, j'ai essayé d'intégrer le motif central dans le message.
For the second card, I tried to make the centerpiece of my card a part of the sentiment:
This is a card for my nephew's second birthday. What is says is "You are 2", which works fine in French because we actually use words that mean "you have 2 years" but I'm sorry to say it would not work in English... you could try to use "you are" on the left, keep 2 as a centerpiece, and use "today" on the right.
27 janvier 2011
WEEK3 (DT's pages) - semaine3 (pges de l'équipe)
***
Cette semaine, ce sont mes jacinthes et mon iPod qui m'ont inspiré mon combo de couleurs... avec au moins une couleur très inhabituelle chez moi, le rose!. Je l'ai associé à un beige/ taupe que vous reconnaîtrez si vous aimez les papiers Kesi'art. Sur la page de gauche, le cadre est lui aussi taupe mais j'avais mal réglé mon scanner et on ne le voit pas très bien... c'est mieux sur la page suivante!
My color combo this week was inspired by my iPod and the hyacinths I grew from bulbs. I used a color I hardly ever use: pink! The other color is a kind of greyish beige I like a lot, and the frame around this first page is exactly that color, only I messed up the settings when I scanned the page and it looks weird... the next one is better!
J'avais pas mal de photos à mettre cette semaine, aussi j'ai opté pour un montage type "pellicule" sur la page de gauche et pour une bande de trois photos sur la page de droite.
I had a number of pictures I wanted to use this week, so I made a filmstrip-type collage on my left page and another larger collage on my right page.
Voici le cadre dans sa couleur réelle, et cette semaine, ma bande avec le numéro de la semaine s'est habillée de rose... Si la photo du milieu est floue, c'est tout à fait normal. Ma fille m'a prévenue qu'elle ne m'adresserait plus jamais la parole si je publiais cette photo sur le net...
Here is a better picture that shows the actual color of the frame. This week, my "week number" strip is pink! See that blurry picture in the middle? Well, it is not blurry on my page... but my D.D. warned me she would never ever speak to me again if I showed that picture to anybody outside the family!
At the beginning, I wanted to use Katell's template... well, at the end, it is not exactly that!!!
***
alexandra
Left page:
I really wanted to showcase this picture with all of its gorgeous winter tones so I enlarged it and chose a non-contrasting p.p to accentuate the "blue effect".
Je tenais à mettre l'accent sur cette photo qui a de belles couleurs hivernales, aussi je l'ai agrandi et ai choisi un papier du meme ton pour accentuer l'effet "grand bleu"
right page:
I had quite a bit to write once again so I chose to frame my journaling with the strips of pictures ( collages made under Picasa ).
J'avais encore pas mal de choses à raconter donc cette fois j'ai pensé à un sandwich: collage photos/journaling/collage photos. ( collages réalisés sous Picasa )
26 janvier 2011
Our takes on Sabine's card!!
Pascale
Nous ne nous sommes pas du tout consultées pour faire ces cartes, mais à l'arrivée nous nous retrouvons toutes les trois avec du kraft!
Although we never discussed together the card we were going to make, we all ended up using Kraft colored cardstock!
Au départ, j'avais juste prévu de coller ma fleur sur la découpe festonnée dans l'imprimé vert, mais mon texte était trop long par rapport à mon motif central, il a fallu que je rajoute un cercle supplémentaire...
J'aime beaucoup cette technique de tirette si bien démontrée par Sabine dans l'article d'hier. Depuis quelques jours, je m'amuse comme une gamine avec mes "vieux" tampons car pour moi ce concept est parfait pour leur donner un nouveau souffle. Merci Sabine!
We'll be back with a second take on Sabine's cards at the end of the week. In the interim, we thank you for your sweet comments and encourage you to play along ;-)
Nous reviendrons en fin de semaine pour une deuxième interprétation du défi de Sabine. En attendant, nous vous remercions de vos commentaires et vous invitons à jouer avec nous ;-)
25 janvier 2011
GUEST-STAR - CARDS/CARTERIE
je vous écris de Belgique, le petit et plat pays du chocolat, de la bière et du surréalisme. Je tiens d'ailleurs presque comme surréaliste d'avoir été sollicitée par Pascale, Alexandra et Virginie pour inaugurer la rubrique carterie, moi qui me suis longtemps sentie tellement "nulle" en ce domaine ; la première fois que j'ai dû envoyer une carte à une scrappeuse, je l'ai achetée...
Hello,
I'm writing from Belgium, this small, flat country home to chocolate, beer and surrealism. And indeed, being asked by Alexandra, Pascale and Virginie to be their first guest for this new Cardmaking feature felt rather surrealistic because for a long time I thought I was terrible at cardmaking. The first time I sent a card to a scrapbooker friend, I actually bought it!
Since that time, though, I have been learning a lot, namely how much fun it is to be able to create cards with small pieces of paper. What I love most is being free to address any topic and use any technique and not having to spend a lot of time or use many supplies, as I would for a regular album page. With a few square inches of paper, I can experiment with inks, embossing, sewing, 3D or pop-ups. There is such a wide range of possibilities and so much fun to be had!
I tend to regard cardmaking as "scrapbooking candy": easy, quick (there's no way I'm spending three hours on a card!) and so nice! It helps me find inspiration when I'm stuck, it gives me the perfect opportunity to try this new patterned paper or this new stamp I've just bought and I want to use so badly!
C'est l'option que j'ai privilégiée pour ce premier rendez-vous carterie. Une irrésistible envie de gaieté, de couleurs -une envie de printemps en fait !- et un joli motif bien sympa ; ajoutez-y un petit effet, simplissime, de texte coulissant, et voilà en résultat une réa toute fraîche, toute pimpante, prête à démarrer pour une boîte aux lettres aux premiers rayons du soleil...
So, for my first cardmaking post, I wanted to bring you happiness and bright colors - well, a hint of spring! A charming pattern, a sentiment on a (very easy to make) sliding strip, and there you are: a lovely card, ready to be sent!
On tire sur le petit bout de ruban à droite...
Just pull the ribbon on the right...
L'effet de petit texte caché, sans être spectaculaire, ajoute une petite note ludique et sympathique toujours très agréable ! Le principe est simple : la bandelette de papier est juste "coincée" entre deux morceaux de ruban 3D au dos du motif, qui lui servent de guide :
... and the hidden part of the sentiment is revealed. Nothing spectacular, maybe, but it is fun and brings that little something to a card. It is very easy to make: adhere two pieces of foam tape to the back of the piece of the paper with the pattern on it, so as to make a track for the strip of paper.
The tricky bit is how to position the words on this strip of paper so that they appear exactly where you want. This is how you do it:
D'abord préparer son fond (pour moi un papier très coloré de Cosmo Cricket), et une déco à peu près 3 X moins longue : ma carte mesure 15cm, mon tampon de demoiselle sur son scooter en fait un peu moins de 5. Imprimer (ou tamponner, ou écrire) sur un simple papier les deux parties du texte, en les écartant sans se soucier de l'espacement. Aucune ne peut être plus longue que les 5cm du motif central, et toutes deux doivent être de tailles à peu près égales : par exemple "Joyeux Noël" d'un côté, "Bonne Année" de l'autre.
First, you need to prepare your background paper (I used this brightly colored Cosmo Cricket p.p) and a central embellishment about one third of the width of your background. My card is about 6" across and the stamp I used (the lady riding her scooter) is just under 2". Then, stamp, print or write your sentiment on a piece of paper. Write it in two parts, the space you leave between them does not matter. Be careful though, none of these parts can be longer than your central embellishment, and it's best if both of them have a similar length. For example, you could have "Merry Christmas" on one side and "Happy New Year" on the other side.
Ensuite positionner le motif après le texte de gauche, et mesurer en ajoutant un cm avant le texte. Ma distance jusqu'au bord du tampon : 4,2cm
Next, place the embellishment after the end of the text that will be on the left side, and measure from 3/8" before the text to the side of the embellishment. We used metric here: 4.2cm.
Draw a mark on your strip at 4.2cm. The height of this strip is the space you left between the two pieces of foam tape, the length will come later.
Now, place the embellishment just before the part of the sentiment that will be on the right:
then place the strip on top of it, taking care to leave 3/8" before the embellishment:
Draw another mark on the strip 3/8" after the right part of the sentiment (10.5 cm here). Then cut out the two parts of the sentiment and adhere them to the strip. Don't worry about the place where they meet, that will be hidden.
The only thing left to do now is to add an eyelet or a brad with a ribbon so the strip is easy to pull...
Côté déco, avec un papier pareil il n'y a rien à ajouter, ou presque : j'ai quand même craqué pour trois petits strass sagement alignés. Blancs à l'origine, ils ont été coloriés avec un marqueur indélébile. Vous avez déjà vu le résultat :
As I used a brightly coloured p.p., all I needed to add was three little glimmer dots:
Since Valentine's Day is coming soon, and it's a time of year where cardmakers are busy, I made another card using the same technique:
Ai-je réussi à vous convaincre ?
Cardmaking makes two people happy: whoever made the card and whoever found it in their mailbox! Plus, it helps you get rid of these scraps of paper that keep piling up on your desk and you can send some really unique cards!
Finally, I would like to thank Alexandra, Virginie and Pascale for having me here and I hope we'll meet again, on this blog or on my blog Pâte à Scrap.
Bisous du plat pays,
24 janvier 2011
FREE TEMPLATE - katell & general infos
Hello there, this is Katell, again to share with you yet another digital template based on alexandra's sketch.
J'éspère que ces templates vous aident pour la mise en page de vos projets! n'oubliez pas que le plus dur c'est de...commencer ;-)) une fois que nous avons trouvé le " fil conducteur "de notre projet toutes les pages sont réalisées beaucoup plus rapidement. Ce fil conducteur peut être par exemple...un fond semblable sur chaque page (comme Alexandra qui a choisi un fond uni blanc), une mise en page identique (par exemple mosaïque ou un template répété sur toutes vos pages), une police particulière....etc! à vous de le choisir pour vous approprier ce projet et réaliser votre album, celui qui vous ressemblera et celui qui racontera vraiment votre année 2011.
I sure hope you find these templates helpful. Don't forget that the hardest part is to give it a go, once you have found your "common thread" I think you'll find the whole process of scrapping a page a week a lot easier. That common thread can be anything really form a particular font, to a unity of color or background it's the beauty of it: find your voice so you can make a album that truly resembles YOU!
Personnellement, je suis bien le rythme : j'ai choisi de répéter des cadres photos style polaroïd (car je fais beaucoup de photos avec mon téléphone et son appli Vignette), un grand journaling et un titre que j'ai réalisé moi même avec 2 polices. Voilà quelques détails de mes premières pages:
I'm happy to report that I have found my rhythm : all my pictures will be "instant" since I'm taing most of them with my iPhone, a long journaling and a title composed of two fonts. Here are a few details of my first pages:
J'éspère que tous ces templates et nos pages vous inspirent et vous motivent!
Hope you're enjoying the templates so far!
Thank you Katell for all that you have done so far!
We'd like to take this opportunity to share a few info regarding the posts to come...
This year, we've decided to make the last week of each month a "card week". We'll have the pleasure of having a guest ( "l'invitée-cartes ) who will share with us her ideas, her cards...
Our very first guest will come tomorrow and we hope you'll come too ;-)
The theme for this month was the big project of "2011 in 52 pages", now that January is coming to a close we'll go back to dedicating a month to a particular theme but with a few twists!!
If you'd like to participate ( for the monthly theme or the cards ) and you have a blog, all you'll have to do is send us a direct link toward your project. In the case that you didn't have a blog, a picture sent to us will work just as well ( 500 res. )
We hope you'll continue to come and visit us! Have a great week!!
21 janvier 2011
Semaine 2
Hello!
Avec un peu de retard sur mes complices, je vous présente ma double page pour la deuxième semaine de janvier...
I'm slower than my two partners in crime, but here are my pages for Week 2!
Je suis restée fidèle à mon idée de deux couleurs correspondant à l'humeur de la semaine, et à ma bande avec le numéro de la semaine.
I decided to stick to my 2-color theme reflecting the mood of the week, and to my strip with the week number on it.
Grande simplicité pour mon côté journaling (parties volontairement floutées), mais je suis très contente de ma photo de pluie sur les vitres de la voiture (on prend les photos qu'on peut!) et de mon étiquette Bloomini Studio, qui fait partie des nouvelles planches à imprimer que je vous recommande.
A very simple page with my journaling for that week on it. I'm very pleased with my picture (my car window on a very rainy day... well, this is about my daily life, isn't it?) and my Bloomini Studio tag.
Un petit montage photos sur la page de droite, avec quelques uns des bons moments du week-end, deux bandes de papier dans les couleurs de la semaine, un petit onglet Bloomini Studio encore, et voilà!
Just a collage on my other page, with memories of the nice weekend we spent with my sister and her family who visited us, two strips of patterned paper in keeping with my week's color theme, another little Bloomini tag... et voilà!
19 janvier 2011
WEEK2 D.T's pages - SEMAINE2 (pages de l'équipe)
J'ai gardé comme la semaine dernière le numéro de la semaine tout à gauche et la bande de papier verticale.
Right page : I wanted to use more pictures than the template indicated so I turned this page into an envelope. I also changed the number of pictures because the template was made for a 12x12" page and mine is 8x8".
***
alexandra
Our goal today is to show to the "traditional scrappers" out there that they can use a digi template in many different ways. (I apologize for the poor quality here.
Avec nos deux pages doubles basées sur le template de Katell, Virginie et moi voulions vous montrer que le scrap papier peut très bien s'appuyer sur un template digital.
Left page: I followed the original sketch and let the colors from the collage dictate my choice of p.p ( Anna Griffin's )
Page de gauche: J'ai suivi le sketch de départ de très près et j'ai laissé les couleurs de la mosaique de photos me guider pour le choix des papiers ( Anna Griffin's )
Page de droite: On peut compter 11 photos dans cette mosaique faite sous Picasa. Elle apporte beaucoup de couleurs et de détails que je ne voulais pas "écraser" en rajoutant une autre couleur de fond que le blanc. ( le Bazzill blanc sera de toutes façons la base de chacune de mes doubles-pages ). La première semaine, j'avais inclus un titre ton sur ton, cette fois meme un ton-sur-ton aurait casser les lignes et détourné l'attention. J'ai donc imprimé "week two" sur une bande de papier jaune. On peut dire qu'elle remplit deux fonctions: celle de fermer le collage et celle de le nommer.
We value your comments and would love to see what you do with your week 2 or with any templates we have provided here on the blog. Thanks ;-)
Si vous avez des questions, une page de la deuxième semaine à partager ou tout si vous avez utilisé un des templates pour une autre page que celle d'une semaine, nous aimerions beaucoup les voir! N'hésitez pas à partager, vos commentaires nous font avancer, merci ;-)
17 janvier 2011
Brushes & a free Template
Aujourd'hui, je vais vous faire faire des économies!!! J'imagine que vous utilisez, et achetez donc, des Wordart/titres autocollants à mettre sur vos pages? Voilà un moyen d'en utiliser à l'infini, en ne payant qu'une fois le pack! alléchant, non???
De nombreuses boutiques de digiscrap vendent des brushes, les plus connues sont évidemment les designeuses comme Ali Edwards (très connue des scrappeuses papiers ) ou Paislee Press (plus connue des digiscrappeuses) .
Donc première étape, vous achetez un pack qui vous plaît (en général ils sont tous à moins de 4$ et sont très complets). ...comme par exemple ce pack:
Vous le téléchargez sur votre disque dur dans vos documents (repérez bien l'endroit où vous les mettez ;-)) . Nous allons pouvoir les utiliser!!!! nous pourrions les utiliser comme brushes mais c'est franchement compliqué...nous allons plus simplement utiliser les fichiers.PNG fournis !
Download it to your computer (remember which file you downloaded it to). We can use them as brushes, but this is a bit complicated, so let's use the .PNG files instead.
Vous ouvrez photoshop ou votre appli , et vous ouvrez un document à la taille de votre page si vous souhaitez par exemple les imprimer directement sur votre papier , ou vous ouvrez la photo sur laquelle vous souhaitez mettre un wordart:
Open Photoshop and create a document, choosing the size you want if you are going to print it, or open the file containing the picture you want to use the brush on:
Fichier>Ouvrir>fenêtre de navigation
File> Open> browser window
Puis vous allez "chercher" un des Wordart/titre achetés précedemment:
Fichier>Importer>fenêtre de navigation > récupérer un des WA du pack (ils apparaissent tous) et sauvegardé dans vos documents
Then you go get one of the brushes/wordart/titles you just bought and stored:
File>Import> browser window> choose the brush you want
Vous pouvez alors agrandir, déplacer votre WA avec le premier outil (celui avec les 4 flèches) dans la barre d'outils à gauche et en cliquant sur un des coins du WA.
You can now enlarge and move your Wordart with the first tool in the left toolbar (the one with the 4 arrows), clicking on one of the corners of the Wordart.
Voilà!!!! reste juste à imprimer votre photo/projet ....c'est simple non? ;-)))
Here you go! All you have to do is print it out.
Vous pouvez aussi le colorer si vous le souhaitez en mettant une forme dessus, et en faisant le fameux CTRL+G sous photoshop et CTRL+ALT+G sous photoshop elements (cf le tuto "Utiliser un template" ).
You can also colour it using CTRL+G in Photoshop and CTRL+ALT+G in Photoshop Elements (cf tuto "How to use a template" ).
***
Et comme tous les lundis de janvier, je vous propose un template!! cette fois ci il s'agit d'un template double page sur une idée d'Alexandra.
And like every Monday in January, I have a template for you. This time, it is a DP based on a sketch by Alexandra.